Previously, on our blog post Teaching the Real Tools, we highlighted the true-to-life learning environment that we provide our students. We set up custom AWS EC2 instances for each student, which allowed them to use a professional code editor (VSCode) while working in a reliably consistent dev environment. This has worked smoothly for both teachers and students: Teachers don’t have to spend valuable time debugging environment issues, and students get comfortable working in virtual environments that are common practice for engineers.
Still, there was room for improvement, and especially with our recent transition from live classes to a fully asynchronous model, we needed a more hands-off approach to virtual environments. Spinning up (and down) the AWS EC2 instances for each student meant that we were constantly having to manage our own dev ops. We automated this as much as we could, but someone still needed to run a script each time a student enrolled in the course. Additionally, students had a somewhat clunky experience that relied on them copying and pasting commands and private keys into the right place.
Once GitHub Codespaces became more widely available, our ears perked up. In theory, it would achieve the same goal as our AWS EC2 instances — a hosted and predictable dev environment. Except with Codespaces, we could rely on GitHub to manage these environments instead of doing it ourselves. With Codespaces, students would also have a much nicer experience setting up their dev environment. Using dev containers and Dockerfiles, we were able to set up the same custom image on Codespaces that we previously had in place. GitHub made the setup relatively painless! We’ve laid out the steps below for setting up this codespace so that you can benefit from our hard-won learnings.
First, we created a codespace in our Analytics Engineers Club organization. There are many pre-built templates out there on GitHub, but we opted for a basic installation of Ubuntu. We also configured some basic tools like Git, Google Cloud CLI, Python, and vim. The codespace gets rebuilt based on these new configurations, and a new file gets added: devcontainer.json. In this file, we see the tools have been added:
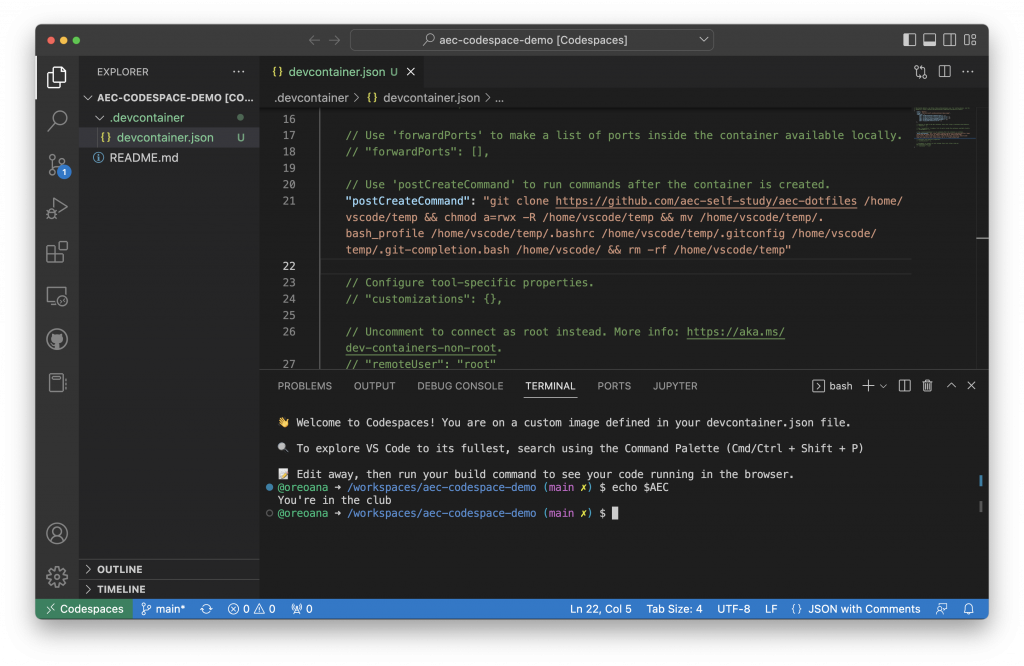
devcontainer.json file provides instructions on what features and customizations to install on each codespace.Typically, when a codespace is created, it pulls from the individual’s personal dotfiles repository so that they can see their own customizations applied. Although this works great for most engineers, we wanted to provide a set of dotfiles for all of our students. We use these files in our command line lesson to show students how to use dotfiles to set up variables, to alias useful commands, and to customize the look and feel of their terminal.
Luckily, in the same devcontainer.json file, there is a postCreateCommand that allows us to run some additional commands after the codespace has been created. We add a git clone command to copy the dotfiles from the AEC organization into the codespace. To prove to ourselves that the dotfiles have moved over successfully, we use the command echo $AEC to see one of the variables that we set up in .bash_profile.

postCreateCommand function in the devcontainer.json file. Here is one of the example command-line lessons we teach.The final step was to set this as a template repository. From this template repository, students can create their own personal repository and codespace with a click of a button. In their codespace, they will see the exact same devcontainer.json file we’ve set up for them, which means they will have all the tools and dotfiles they need for their lessons! Codespaces has made it such that engineers can “start coding instantly,” which means our students can, too.


